
Previously in, I was trying to figure out if the project is doable. If you are interested in the Raspberry Pi NAS speed, and media playback please check the part 1. Everything has been working well but more prototyping was required. Yes, you can simply throw everything in a box and pretend you have a neat solution by hiding this monstrosity in a cupboard. I’m not going to do that. Currently, I’m waiting for a parcel with HDD enclosures and an acrylic glass. While this is in progress, there are things I need to do.
The Design of Raspberry Pi NAS

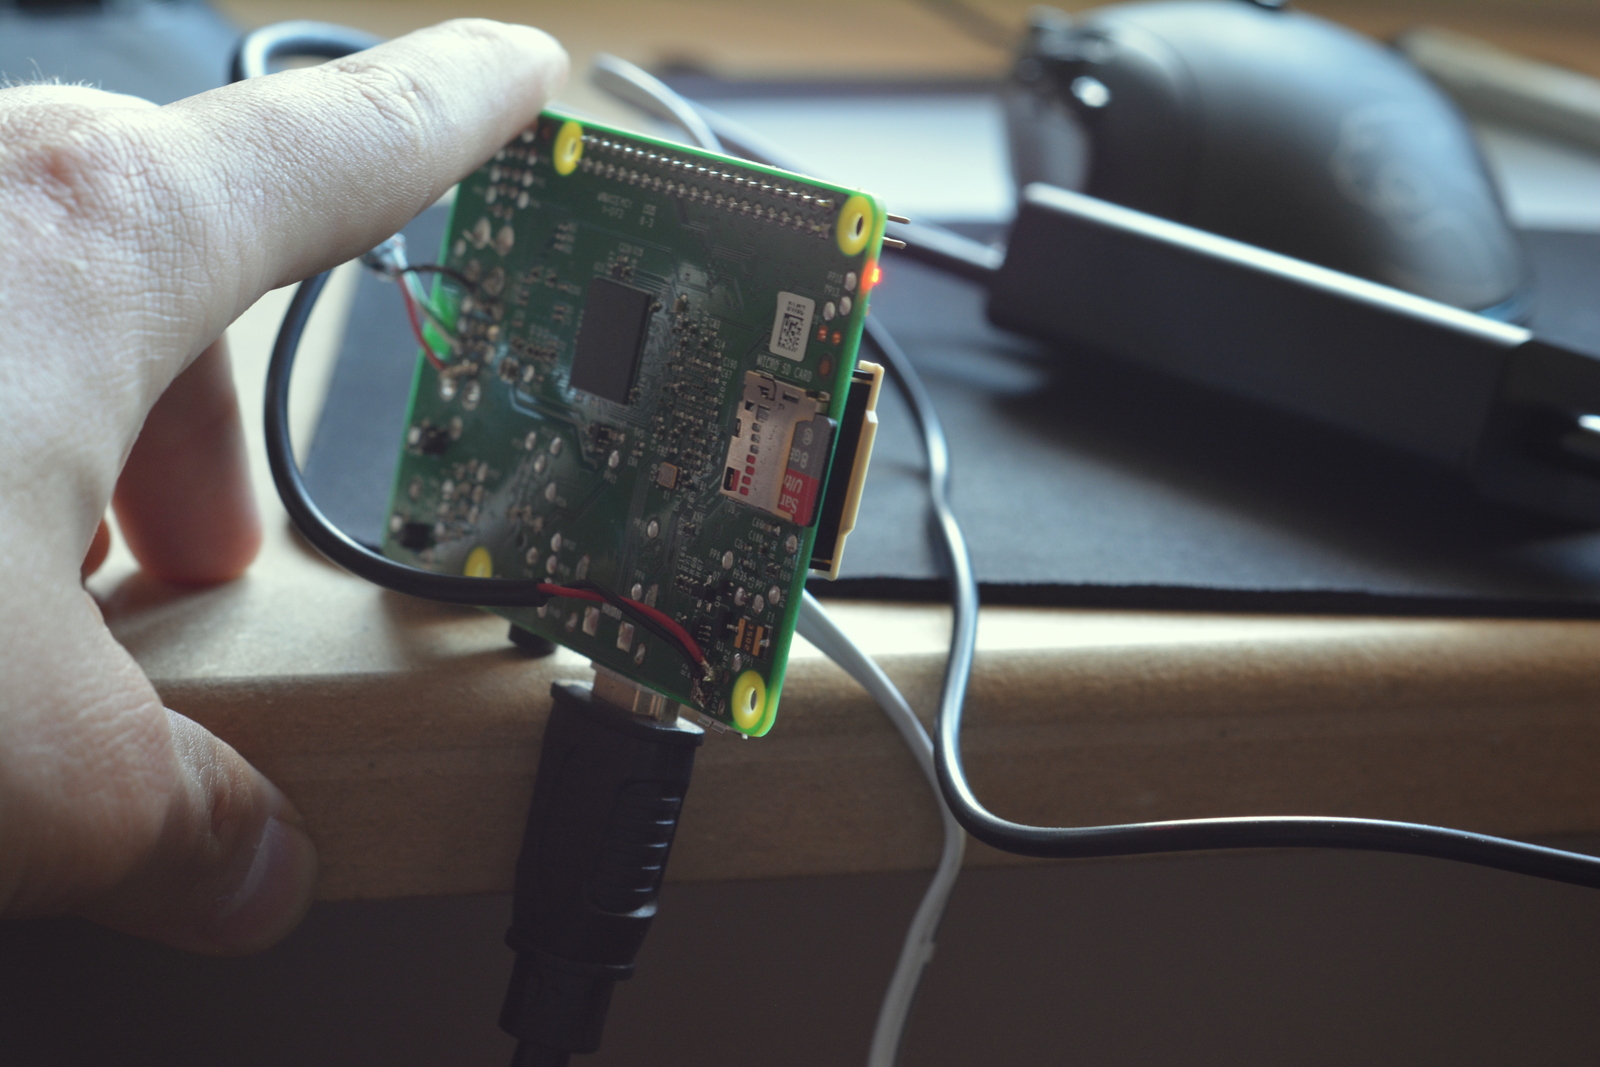
There are two main issues we are going to solve. To power the Raspberry, there will be a microUSB sticking out of the side of it, or we are going to use pin2 and ground on GPIO which will provide the unfused power. I’m not a fan of either of the options, therefore I will be soldering the power cable directly to the PCB.
The second issue is the USB. I need to connect a cable going from the USB to my hub. Ideally, I’d like to have USB ports outside of the case for an easy access. This would leave us with another cable sticking out of our box. This is not going to happen. As above, I will solder the hub directly to the PCB.
USB modification

The dual USB socket must go. I’m picking the middle one, mostly because if Ethernet wire is present, these are more difficult to access. There is no rule here, pick one and extract. I have to admit I was little impatient, and I have cut off the pins before using the soldering wick to remove the socket. Try doing it in short bursts to protect the PCB from overheating. If you are careful and patient you will also salvage a usable dual USB port for the future projects. Don’t damage the port too much, we will still need it.

Once the port is detached, I cut the hub’s USB lead. I need the cables exposed so I could solder it to the board. As this is a USB 3.0 we have many more cables that we simply not going to use. Although I could use an online guide and trust the colours of the wires, I had my doubts. I saved the plug from the hub and using the multimeter I could identify the wires and pinout correctly. The default configuration should be Red (5V VCC), White (Data-), Green (Data+), Black (GND). If you are using less reputable source for the cables, please test the cables directly with a multimeter.

RED, WHITE, GREEN, BLACK or is it?

Please don’t confuse the wires. Especially the red (5v VCC) and black (GND). Initially, I soldered the white and green in an opposite fashion. I’m happy to report that despite trying this out with a hub and a keyboard connected there was no damage to the USB.
Correct lineup
Next time I know I should take my time. But this is a prototype, and it is for the best that I will make all the silly mistakes so you wouldn’t have to. Once the wires are connected correctly I have tested the Raspberry Pi NAS again with the keyboard. This time, I was able to use it. Success!
Power

It was the time for the microUSB bypass. A little bit of googling confirmed that if I wish to ignore the GPIO option, the best solution is to wire the power to P1,p2 test spots (RPI2) for 5V and P5 for GND. Avoid soldering your wires to the fuse directly. It is never a good idea. I also got little lucky, the microUSB cable I decided to cut for this use, turned out to be a charge only cable with 2 internal wires. This means less hassle. The cable will be placed internally so try picking one of the thinner ones. The previous cable I used for this didn’t have the black wire!!

The job was simple enough. Quicker than all that mess I had to go through with the USB port. As this is not the final solder I’m ignoring the safety and wires are not secured. This is mainly to show you, how should you proceed with your soldering. Later on, I will be making sure there is no risk of a surge and securing the cables with hot glue.
Raspberry Pi NAS 2.0
I’m happy to report that the final test has been successful. Both hub and the RPI are powered by the adapter hooked up to the hub. Raspberry is booting up and I’m able to move to the next stage.
Shopping for components:
| Item | Amazon UK | Amazon USA | Aliexpress.com | Banggood.com | Comments |
| 1 x USB 3.0 4 port hub | £8.99 | $9.99 | $6.64 | $11.99 | I picked the microUSB powerd one, other are available |
| 4 x USB angled cables | £6.99 pack of two | $6.99 pack of two | $1.68 | $2.99 | Plan the bends accordingly |
| 1 x 2.5 -3 A 5V power supply | £5.79 | $8.99 | $4.99 | $5.75 | Works from 2.4A but aim for 3A if possible |
| 1 x Raspberry PI 2/3 | £32.00 | $35.10 | $39.50 | $39.99 | There is no speed penalty for RPI2 |
| 3 x HDD | £5.95 | $8.99 | $8.49 | $9.49 | Needs to have a specific opening mechanism |
| USB hub with power 2.5A | £12.22 | $16.99 |
What’s next?
Currently, I’m waiting for a very clever HDD enclosure that will let me hot-swap the drives while fitted inside of the case. I’m also waiting for some fancy acrylic glass. I’m very impressed with the colours you can get. I will order the frosted glass effect for sections that suppose to cover the wires and nice transparent and fluorescent effect for sections where I can show off some LEDs etc.


 server")

 Network attached storage under $21* #part1")


