
This beginner’s guide aims to give you basic knowledge, and understanding of electronic circuits. The Very much-needed thing if you want to explore RPI and Arduino boards. I hope this will give you a great source of information to tackle your projects, and a ground to explore the topic more.
After getting my Arduino board I quickly realized, that some basic knowledge is required for 2 key reasons:
- to work smart and prevent your components from taking any damage
- to learn when scripting can be replaced with simple circuitry
The first point goes without thinking, power can cause damage to your chips and modules. You can also use your components to drive the certain behavior of your components. Sometimes clever use or resistors, transistors, and capacitors can be equally effective as writing a python script. And it turns out much cheaper, as the circuit no longer has to be connected to the board itself!
Basics of electricity: A/C vs D/C
For our use, we can simplify this to socket power vs something that would be supplied through your 9V battery, USB port or a charger.
Alternating Current comes in many volts and it is the one to be really careful about! It runs through the wires with usually 50-60Hz frequency alternating the direction of the current. In many cases, you simply don’t want to play with this until you get an actual knowledge of what you want to do.
Direct Current is what we will be dealing with most. As the name suggests the current flows in a specific direction – from an anode (+) to cathode (- or ground/GND). The anode is a point with the higher voltage available within the circuit and the current flows towards the lowest voltage point (cathode). Your typical power sources are safe to you (USB, battery, charger) as the voltage is nowhere close to cause any harm, but can fry your components!
In both cases, it is important to remember that current will flow using the path of the lower resistance as a default route. If your design allows current to find an easier way to travel, it will, and it will cause a short-circuit.
The law and order of electricity
There are 3 values we have in mind when talking about currents. Voltage (V), current (I) and resistance (R). Math on the table:
V=I*R or Ohm’s Law
This is not the most complicated equation but has a very practical use: keeping our equipment alive. Let’s break it down, shall we?
- Voltage is a value of the differences in energy between the point of the highest voltage (anode +) and lowest (cathode -), expressed in Volts (V)
- Current is a value that describes how much electricity goes through the circuit in a specific amount of time. It is expressed in Amps (A)
- Resistance is the circuit ability to ‘slow’ down the energy transfer. Often enforced with resistors, it is expressed in Ohms (Ω)
Understanding these statements will allow you to create your own circuits without getting into a situation where you risk your elements being damaged.
Parallel vs serial
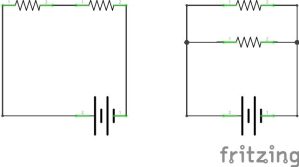
To make things even more complicated, playing with the equation above is driven by the design of your circuit. Connecting cables in a specific way will change energy flow.
- Serial – elements are connected in line, the current has only one way to flow, Components are said to be connected in Series if the same current flows through component.
- Parallel – elements of the same polarity are connected to one point, the current has multiple ways to travel Components are said to be connected in Parallel if the same voltage is applied across them.
Kirchhoff’s 1st Law
total current or charge entering a junction or node is exactly equal to the charge leaving the node as it has no other place to go except to leave, as no charge is lost within the node
Kirchhoff’s 2nd Law
in any closed loop network, the total voltage around the loop is equal to the sum of all the voltage drops within the same loop
Depending on the circuit design Voltage and Current values will change based on the way you linked your wires and components.
In serial connections current remains constant, flowing from one to another element (unless such element is designed to reduce current). Voltage is to be reduced passing every element in the circuit. This is calculated by the formula:
Va+Vb…. +Vz =0

In a parallel circuit at the node (junction of the wires) value of incoming Current is the same as the value of outgoing one. If we run a wire, and split it into 2 parallel connections, we are essentially dividing current by 2. 4A Current after the node would have 2A values on each wire leaving the junction.
If more incoming wires are attached to the node, the total sum of their corresponding currents is divided by the number of wires exiting the node ie. 2 wires supplying current of 6A each is routed to a node, and 3 wires are leaving the node. The Current of each wire leaving the node would equal to:
(6A+6A)/3 = 4A


 server")

 Network attached storage under $21* #part1")


